|
|
Dipstick
Feb 21, 2023 21:34:58 GMT
via mobile
Post by 1800heap on Feb 21, 2023 21:34:58 GMT
Thanks for the info Chris and Snoopy. I think I should be in the ball park now.
Nick
|
|
|
|
OKR
Feb 21, 2023 21:15:30 GMT
Post by 1800heap on Feb 21, 2023 21:15:30 GMT
Jigsaw puzzle! Not much left of the fish bowl as you can see. Lots of curves to get back into place! 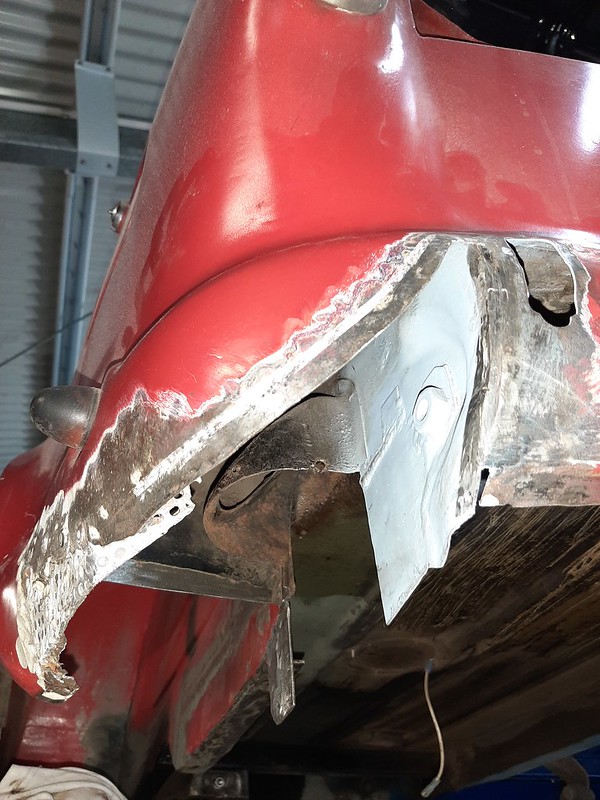 This is the small section I already made from the last time I visited the area.  More to cut out.  Start cutting. Looking a bit sad now!  Here I have started to shape the body to fit the new section.  Then I am test fitting, adjusting and adding bits to fill in the whole section.  After a considerable amount of fettling and adding bits, this is the part I end up with.   I now have to start making the front section of the arch. I need to use a template copied from the OZ car, to get the arch shape back to how it should be. Next time! Nick |
|
|
|
OKR
Feb 21, 2023 9:44:25 GMT
via mobile
Post by 1800heap on Feb 21, 2023 9:44:25 GMT
Thanks Chris I did wonder half way through if all the effort was going to be worth while! I think if I had found a new old stock rear wing I would not have wanted to cut it up for such a small piece. I must say I am impressed with your efforts in the parts reproduction department. Just shows what you can do if you put your mind to it. Nick That's a fantastic effort, Nick. Huge learning curve accomplished - very well done. You're right about release agents. I have used a variety of "official" (and expensive) ones during my own mould making, all of which gave poor results. I settled in the end on cheap aerosol beeswax furniture polish! Works a treat. Chris. |
|
|
|
OKR
Feb 21, 2023 6:29:14 GMT
Post by 1800heap on Feb 21, 2023 6:29:14 GMT
Ok so at this point I have the fiber glass copy. The plan was to make a reusable plaster copy with the fiber glass section and then use that to make the concrete formers. The concrete was going to have two parts so that the metal panel could be pressed into shape using the same method body panels are normally made. I wanted the plaster to stay attached to the plywood, so there are a couple of metal strengtheners bolted to the ply that would be inside the plaster.  Here it is sealed up ready to pour the plaster.  Plaster poured and dry.  Success, with bit of clean up required.  Cleaned up painted and polished. I took quite a bit of time here because it was going to be reusable. Unfortunately, there was a flaw in the plan!  Boxed up ready for concrete.  Vibration from an old orbital sander sorted.  Concrete poured and vibrated to get the air out.  Concrete all good but sadly at the expense of the plaster, as it had to be chiseled out! The release agent did not work but I think the main problem was no flexibility in the plaster or concrete. As I am sure Chris will agree, as our expert with these things. I was never going to get it out in one piece. I needed it to be rubber not plaster. Oh well! So having wasted time making the plaster part perfect that I had just destroyed, I decided to use the concrete as a former and not a press, and hammer the part into submission. In actual fact I should have realised that the inner part of the press needed to be a copy of the inner section of panel, not the outer section, so even if it came out it would not have been any good to me. There has to be a gap in the outer and inner parts of the press where the metal ends up getting pressed into. Doh!  Not to worry I got the part I needed, all be it with some slight damage to the concrete due to hitting the metal quite a bit in certain areas. I had hoped to be able to supply some repair panels, but that will have to wait until I get time to finish it as a press.   Here it is. All that effort for this, you might say, but it is an accurate copy of the section and as you will see in later posts it fit the car nicely. I would have never got that trying to shape it by eye.  Nick |
|
|
|
OKR
Feb 20, 2023 22:43:13 GMT
Post by 1800heap on Feb 20, 2023 22:43:13 GMT
It has been a while since I have posted on the forum, I am finally near to finishing the section that has been taking all my time so here is a quick update. I had been avoiding the fish bowl section on the near side because I thought it was going to be an extreme pain. I can say now I was right, it was! Eventually there was no choice but to get on with it though. You may remember I did post quite a while ago about making a concrete former, for the repair. I needed a section of the rear wing which is a very difficult shape to beat out of a flat piece of metal! There was a lot of different stages to the fix as the rust was in the wheel arch as well so I will have to do several posts to cover it. So here we go on the concrete former. This is the OZ crab, as previously posted, that I have prepped to make a fiberglass mould. 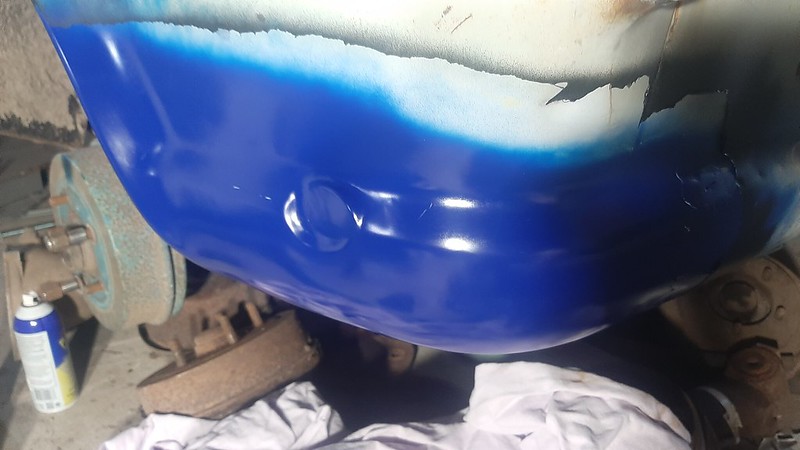 Glass going on.   As you can see my release agent did not work!  But the copy was ok after a clean up.  Well I am out of time already and have to go to work, so this will be it for the first post. I will have to catch up with all the other new posts from everybody later! Nick |
|
|
|
Post by 1800heap on Jan 10, 2023 21:20:23 GMT
Hi Chris I am honoured you called making your part doing a Nick. Why buy a part when you can spend hours making one. Well because we can, Im with you! Glad to see your workbench is as cluttered as mine Chris. The cup of tea is obligatory but Tottenham Hotspurs what!  The miss alignment of the drive shaft may have damaged your diff washers, depending on how long it has been like it. Have you got any difference in the gap between the front of the sill and the wheel when you check between sides? Sometimes its bad enough for the wheel to rub on full lock. The Oz crab was bad. A front end prang I think caused it. Actually the chassis was bent where the driveshaft goes through the body. Not easy to straighten either, but was fixed with a jack, heat and big hammer. Hopefully just the engine mounts and bottom stabliser adjustment causing it. Nick |
|
|
|
Post by 1800heap on Dec 29, 2022 20:42:26 GMT
I haven't seen anything like this on my oz mk11. I have seen it with dial circuit brakes on a Triumph. Not PBR but may be the same idea. It was a pressure differential valve. When one of the brake circuits fail, the valve senses the pressure differental, the switch clicks over and shows a brake warning light. They are a pain for bleeding the brakes and not that easy to reset! There is no mention of such a valve in the Oz crab WM that I can see. Can't think of anything else.
Nick
|
|
|
|
Post by 1800heap on Dec 3, 2022 3:37:20 GMT
Hi Chris
Sorry to see you have had the car damaged. There is no shortage of D heads in this world unfortunately!
I haven't been on here for a while and David told me today. Too many things going on!
I must admit to being a bit demoralised by the lack of dipstick replies!
I also have to apologise for the lack of reply regarding the dipstick pm. Thanks for trying for me. It should be ok though as I have gone somewhere in the middle at this stage.
Nick
|
|
|
|
Post by 1800heap on Oct 28, 2022 21:43:33 GMT
Thanks for the HELP heading, and the info Chris. Hopefully I can get some MK3 info form other readers. In an effort to not confuse things myself more, I may need to re-post so that I am using the same naming as you. Just to confirm this is what you mean a picture.  I have also found the OZ dipstick for the MK2 YD engine, and it is identical to the MK1 in all respects. There is a slight complication with that, according to the Oz Gregory's WM, YA is an auto engine and this one is sitting on a manual box. It therefore does not confirm 100% the manual OZ Mk2 if you believe the WM! With OKR, I loosened the tube nut and lowered the tube about a centimeter in a effort to get the oil quantity to about 8 litres. I consider this a safer starting point. The measurement was somewhat upset because some idiot forgot to tighten the sump plug, resulting in a big slick of oil on the floor overnight! I will have to drain the oil now if I want to check the quantity exactly. Oh well! What is your feeling on this subject? Does it really matter that much up to a point? Is it just because they are useless? Is there legitimate reasons for the number of different lengths? I am leaning towards this. There is quite a wide range where it makes little difference. Other than there being a larger or smaller quantity of oil in the gearbox. The ute engine, which would likely work harder due to greater weight, has more oil it. This makes sense to me. Oz conditions ie hotter and worse roads, more oil is beneficial I would think. Obviously up to a point! This helps to explain the wide variety. Incidentally the Oz Gregory's manual quotes a with filter oil change at 7.38lt. From the numbers so far I am going to make a conversion that should compare apples with apples! OKR Shoulder to MAX mark 461mm Current Tube height now 290mm 461-290 = 171mm So 171 mm is the section that drops from the top of the tube nut into the sump. Because I have taken off the tube height this is now constant figure which will allow a direct comparison. If I do the same sum with all the different engines as below you can see what I mean hopefully! OKR (300mm Tube height) = 161mm to Max OKR (290mm Tube height) = 171mm to Max Red Dog = 189mm to Max Eugenie = 190mm to Max Oz Mk1 = 185mm to Max Oz MK2 (Auto ?) = 185mm to Max Oz Ute = 165mm to Max The lower the number the more oil in the engine, so the Ute wins at 165mm. I would not venture below this number as it is the most oil in any of the factory setting so far. Unless another MK3 owner gives me some numbers. I suspect my tube height was not correct to start with. The tube was bent up, so I straightened it and this may be the source of the bad adjustment! Nick |
|
|
|
Dipstick
Oct 25, 2022 5:57:14 GMT
via mobile
Post by 1800heap on Oct 25, 2022 5:57:14 GMT
Oh dear oh dear!
So I think OKR (Mk3)is almost identical to Chris on the dipstick side.
Metal blade only = 457mm
Neck to low mark = 473mm
Neck to High mark = 461mm
Neck to tip = 482mm
But the tube is wrong on OKR at 300mm rather than 270mm.
The tube height is what I need clarification on.
Oz engine 18YA/RC/H (Mk1)
Metal blade only = 447mm
Neck to low mark = 464mm
Neck to high mark = 445mm
Neck to tip = 474mm
Tube height = 260mm
Oz engine 18YF/Ta/H (ute)
Metal blade only = 425mm
Neck to low mark = 445mm
Neck to high mark = 425mm
Neck to tip = 454mm
Tube height = 260mm
Notice the Oz tube is consistent at 260mm. This is an important measurement as it can be altered because of the olive arrangement.
I have an Oz Mk2 18YD/Ta/H but can't locate the dip stick at present unfortunately.
More numbers required for clarification and hopefully we can get it into the tech section.
Nick
|
|
|
|
Dipstick
Oct 24, 2022 22:12:21 GMT
via mobile
Post by 1800heap on Oct 24, 2022 22:12:21 GMT
Thanks Chris and David.
Chris from how I understand you are measuring, and the way I read my WM you have a 457mm dipstick. The WM says dipstick blade measurement 457mm. If I measure just the metal blade mine is 457mm. I can't see this is a coincidence. If I measure it your way, I get 483mm so basically same as you. That means as I get 300mm on the tube that could be my issue.
It would be good for a couple of other readers to confirm what they have. Please!
I will measure the Oz dip and see what that is.
No wonder they had issues. The other problem is the tube has an olive to secure it, but if you move the olive the tube sits at a different dip length!
Nick
|
|
|
|
Dipstick
Oct 24, 2022 6:31:20 GMT
via mobile
Post by 1800heap on Oct 24, 2022 6:31:20 GMT
Could I please get a couple of you to give me a measurement from your MK2 cars. I think I have an oil level issue, as I just put in nearly 9lt of oil in to get to the high level on the dip stick. This was dry and included the transfer case but still seems too much. I have a 457mm dip stick blade. Could you please give me a length of your dipstick tube. Thats assuming you have a 457mm dipsick blade. Probably easiest to get a piece of wire or non stretchy string and offer it up to the tube. Hold the end of the measure on top of the nut next to the tube. This is the nut that holds the tube into the block. Then measure to level with the opening for the dip stick. My one is 300mm. Thanks in advance guys. It is a little awkward sorry!  Nick |
|
|
|
OKR
Oct 20, 2022 20:31:50 GMT
Post by 1800heap on Oct 20, 2022 20:31:50 GMT
Getting there with the engine! I am just trying to sort out the dizzy so I can put that back on and I am back into the body work. I even found a badge to go on the rocker box cover.      It may be unique. Nick |
|
|
|
OKR
Oct 18, 2022 20:31:46 GMT
via mobile
Post by 1800heap on Oct 18, 2022 20:31:46 GMT
Be good if it works. Nick No idea what the results will be so it may be a waste of time. I can tell the difference between A-Series cars with standard thin steel and thick cast alloy aftermarket rocker covers, you may be pleasantly surprised! |
|
|
|
OKR
Oct 18, 2022 20:29:37 GMT
via mobile
Post by 1800heap on Oct 18, 2022 20:29:37 GMT
Thanks David Sorry I was ambiguous saying about the 1800S dizzy. I do not have an 1800S dizzy, I plan to put one together if possible with the units I do have. Not an easy task it seems! Im hearing you, the future plan is an electronic adjustable advance curve. For the moment, for safe running of the car, I need a serviceable unit that is somewhere in the ball park so as to not hurt the engine. From your advice I can see the standard dizzy may well hurt the engine should I happen to give it some beans! I had been unable to work out what the advance numbers mean on the vac units, so that is very helpful. Typically the 4-11-7 unit I have seems to be jammed! Will use the 4-12-8 as it is the closest. With regards to the springs, the advance curve is not as steep as standard so stronger springs? I can see I am going to have to make something to test what is going on with the springs. If I use the 10° cam I have, that gives me 20° crank max, plus if I set the advance to 10° the total max is 30° so a conservative max for this cam? Sorry alot in there thanks for the help David. Nick |
|


