|
|
Post by Penguin45 on Apr 5, 2012 20:04:57 GMT
LEDs - hmmm. I'll take that one on advisement for the moment, seeing as they're all now working.
Thoughts on getting a clutch pedal, please. I have bought a Gunson Eezibleed kit and put through lots of fluid. I have removed the slave cylinder and raised it and twisted it to get the nipple to the highest point. I have pumped and bled at the same time. I have even crawled under the dashboard to check for fluid leaks. Nothing.
About ten sharp pumps and I can get a soggy pedal, which then fades out again.
Getting annoyed.
Chris.
|
|
|
|
Post by Penguin45 on Apr 5, 2012 20:10:55 GMT
And another thing..... There isn't a cap in the Gunson kit big enough for the brake master. I've got an old master cylinder and I can't get the cap of in order to drill a hole in it to take the pipe work.
I'm off to the pub.
Chris.
|
|
|
|
Post by Keef on Apr 6, 2012 5:30:20 GMT
Thoughts on getting a clutch pedal, please. If you do eventually get a pedal it's not the usual pushrod. Try replacing the old (working) components, maybe you have a collapsed hose? |
|
|
|
Post by kelsham on Apr 6, 2012 7:41:25 GMT
I would suspect the master cylinder seals leaking. It is easy enough to change them and I have had to replace them on my car a couple of times.
Regards kels.
|
|
|
|
Post by tommydp on Apr 6, 2012 8:04:05 GMT
Chris, try bleeding it the old fashioned way. Keep master cylinder full, connect a hose from the slave cylinder into a jar of brake fluid, open up bleed screw slightly. Make sure you don't open it too much, as it wiil bleed through the threads of the screw.
Have Mrs P pump the pedal in long, slow strokes, when no more air bubbles appear in the bleed jar, keep pedal fully in and close bleed screw. Keep master cylinder full of fluid. It could be the master cylinder piston is stuck. Try tapping front of cylinder with a rubber hammer. Initial bleeding/ pumping may be easier if you do the first pumps by hand, at least I've experienced this, the piston will free more easily if stuck. And get that carpet out of the way, so the pedal gets to the floor.
Good luck! Not long now!
Tommy
|
|
|
|
Post by Penguin45 on Apr 7, 2012 0:14:47 GMT
MrsP help with car maintenance? I'm afraid it doesn't happen. However....... My mate Ady came down in the morning and we made absolutely sure that the clutch was free of air. We got to a point whereby if you stamped on the clutch pedal, it worked and held pressure. If you gently put you foot on the clutch pedal, it went straight to the floor with no resistance whatsoever. So - clutch slave is brand new, as is the flexi hose. Flexi hose is fine - it has one hole straight down the inside and none pointing to the outside. Subbed the old cylinder back on; extensive and lengthy bleeding left us with exactly the same problem. That leaves the clutch master cylinder. I found (eventually) a seal kit. It was in a green Lucas box, so my initial fear was "If I fit this, the lights will go out". I overcame my prejudices and fitted the new seal kit. Ady popped back down and 10 minutes later we had a working clutch. Another 15 minutes and we had brakes as well. A bit later on, I crept the car out of the garage and went twice round the pub car park and everything seems to be fine. I didn't go any further as I haven't got the bonnet back on yet. I'll do that in the morning now that my boys are back home. Seeing as the garage was empty, I had a major tidy up - two large black bin bags were collected in pretyy short order. It is just amazing how much mess can be made so quickly. Overall, I'm pretty pleased. Bonnet back on and some refitting inside the car and we should be good to go. Just in time for the MoT test........  I've got a few days left, so I think a decent run out is called for. Chris. |
|
|
|
Post by Keef on Apr 7, 2012 0:21:57 GMT
I overcame my prejudices and fitted the new seal kit. Ady popped back down and 10 minutes later we had a working clutch. Great news!  |
|
|
|
Post by kelsham on Apr 7, 2012 7:49:56 GMT
Good news, I thought it would be leakage past the seals in the Master cylinder. Now the pause for thought. What are the rubbers like in the brake Master cylinder?
I replaced mine when I did the clutch rubbers on the basis that one would probably age at the same rate as the other.
Regards Kels.
|
|
|
|
Post by Penguin45 on Apr 7, 2012 17:53:27 GMT
That's a fair point, Kels. The brake master was a brand new unit in 2009, when the car first went back on the road, so hopefully no problems there; although I confess that I didn't pull it apart to inspect it this time.
Bonnet now back on and I've driven some 25 miles this afternoon. First run out, the car was quite "lumpy" and wouldn't quite idle. I then tweaked the timing slightly and the idle rose a tad. With the the engine re-warmed through things were slightly better, altough the idle dropped out again with a hot engine. Third go saw a further tweak to the timing, raise the idle quarter of a turn on each carburettor and the fitment of the AAA needles in the HIF4s.
Transformation....... ;D ;D ;D ;D
So - cleaning, bit of dodgy and chipped paintwork to sort out and then I suppose I'll have to start polishing.
Really pleased.
Chris.
|
|
|
|
Post by Penguin45 on Apr 10, 2012 0:03:05 GMT
Did a load of paint work on Sunday.  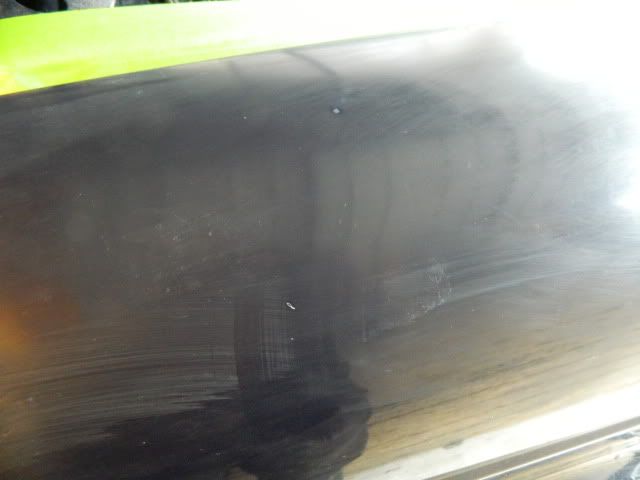  These are spatters caused by hydraulic fluid which didn't get noticed immediately and they've gone straight through the cellulose. The white marks are the undercoat, which being acrylic, doesn't seem to react. If you spill the stuff, get it off, quick! I had taken the car down to the petrol station for fuel and the jet wash. It was covered in angle grinder dust, so "contact" washing struck me as a bad idea. This little lot came to light afterwards. Scrubbed up both wing tops with 400 then 800 grit wet and dry. A good dose of panel wipe then prep wipes got the surfaces nice and clean, then blew over 4 coats of paint. The big compressor meant I could get the gun back out again, rather than the Apollo HVLP. 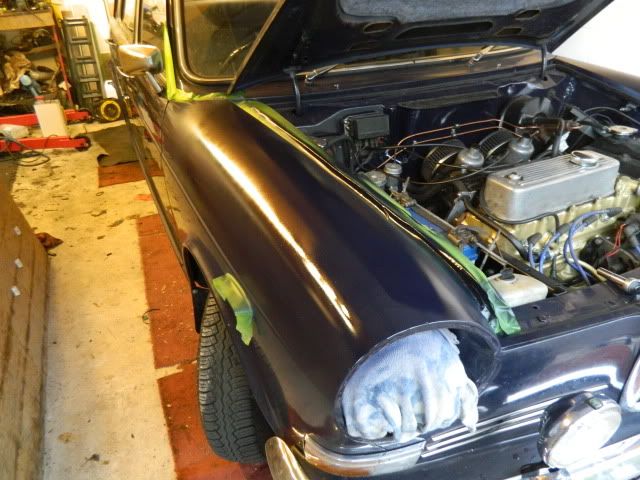 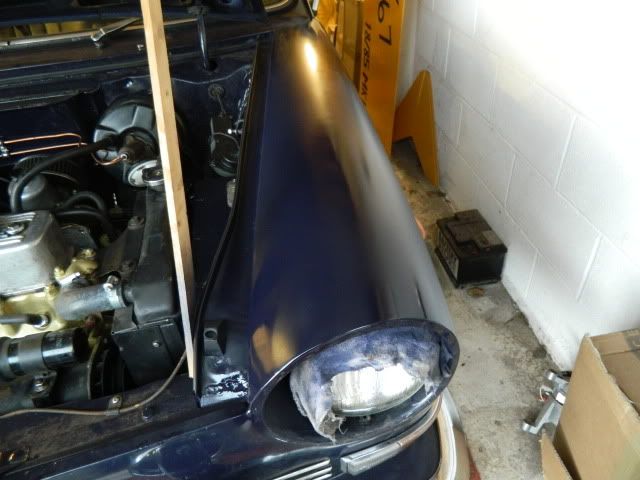 I was reasonably pleased with these results. However, I had managed to mix up rather more paint than required for this job, so dealt with the rear wing. This was painted last winter with some aerosol cans. Despite ordering from my usual supplier, it came up a significanty different colour, as my Landcrab chums rather gleefully pointed out over the course of last summer and autumn. 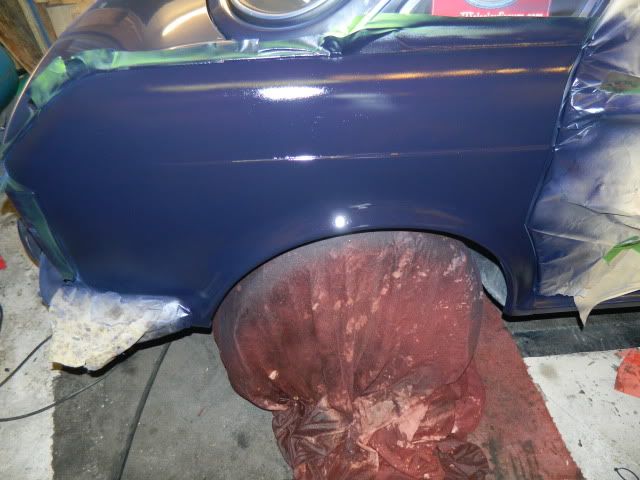 Today was spent flatting back and rubbing down - 800, 1200 then 1500 grit wet and dry, followed by G3 compound a couple of times. The last one, I used the motorised polisher. 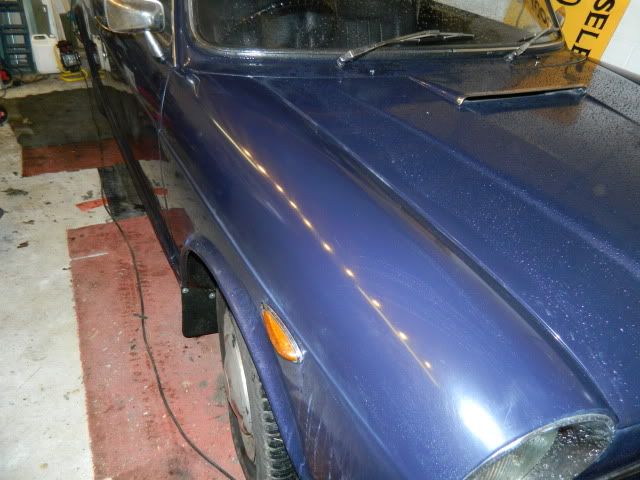 This is good; 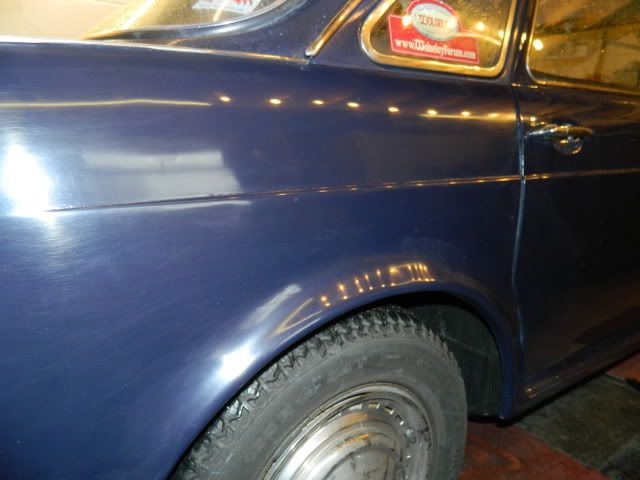 and this is good. N/s/f wing has a couple of issues - blooming on the surface suggests that I didn't get all the hydraulic fluid off one area, so I may have to rub that back and do it again. Might have just enough paint left. Indy was interested in the splash shield fitted behind the grill on my car. It's pretty simple, really. 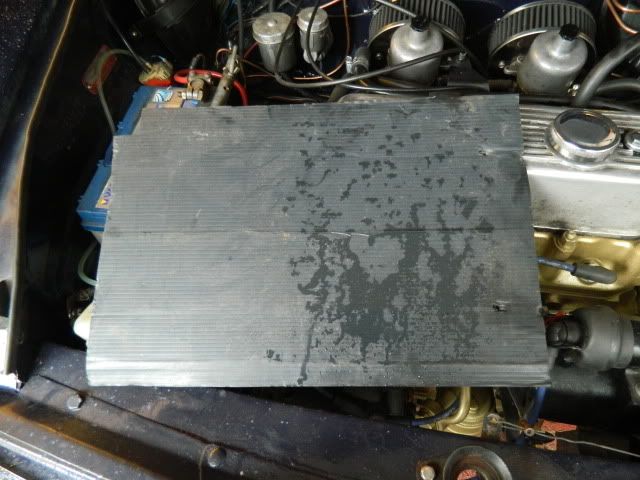 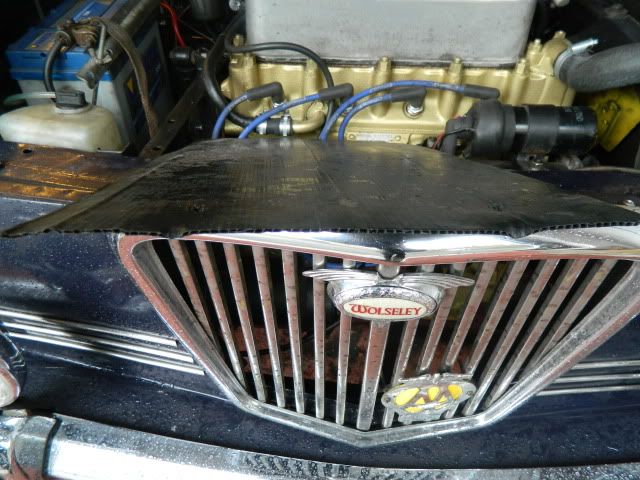 This a piece of corroboard, or corrugated plastic, recovered from an Indesit dishwasher. It's 17" x 12", it has a nibble out of one corner to fit round the horns and has two holes punched in one end to allow it to be strapped to the centre strut behind the grill by a couple of black ty-raps. It does stop the weather going straight into the distributor. Simples..... 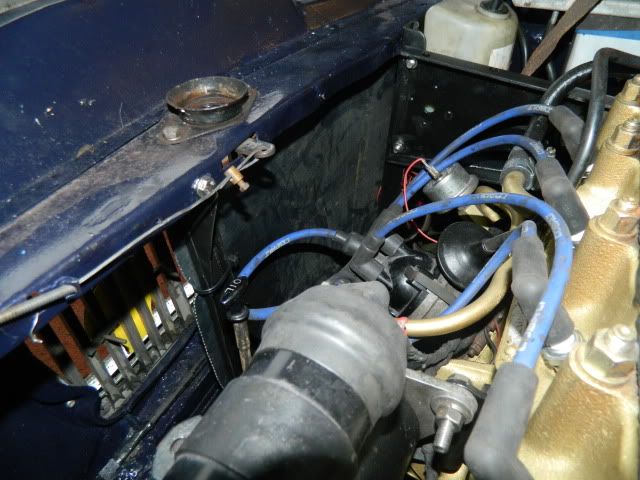 Need to do some driving - got 1,000 miles to do before I can let rip and enjoy myself fully. Chris. |
|
|
|
Post by dave1800 on Apr 14, 2012 6:18:32 GMT
How's your 1000 mile marathon going? It would be good to do a long journey after you are happy all is well to run it in properly. Is the paint you are using a genuine cellulose? My friend with the MGB has had all kinds of compatability problems, maybe he needs to consider an acrylic undercoat? Well done again regards David Did a load of paint work on Sunday. These are spatters caused by hydraulic fluid which didn't get noticed immediately and they've gone straight through the cellulose. The white marks are the undercoat, which being acrylic, doesn't seem to react. If you spill the stuff, get it off, quick! Chris. |
|
|
|
Post by Penguin45 on Apr 19, 2012 0:48:47 GMT
Hello everybody. I'm afraid this has slipped over the past few days. Thing have been a trifle manic to say the least.
The weekend saw the loan of a portable emissions tester, a couple of Colourtune kits and a stroboscopic timing light. All came with instructions, so I dutifully read them. Now being an expert, I set to with these lovely gadgets. Firstly, the CO2 reading settled at 6.3%, which is appalling. Chris the painter, the curator of said artifacts, said he could smell the petrol from the exhaust...... So, a bit of controlled fiddling with the carburettor mixture screws (HIF4s - out is leaner) she managed to settle down at 2.7% with a steady idle and a reasonable balance on the carbs. Book says 3% - 4.5%, but hey - it's a new engine and the carbs have lovely shiny new AAA needles. The Colourtune plug inserts were added to cylinders 1 + 4, and further very minor tweaking got them flashing a very clear blue, so I was really rather pleased with that.
The timing light was a disaster. As noted earlier, the dizzy drive is 90 degrees out, so the leads on the cap are 90 degrees out, so, the marks on the pulley in relation to the marks on the timing chest cover are 90 degrees out. Got a "best fit" solution by feel and the car now seems positively frisky.
David, the mileage is up to a staggering 62! LOCI club night next week, so that'll be a 70 mile round trip - a good start.
The paintwork has got to a FITWiD stage. I can only use proper cellulose paint at home safely, and the base coats were acrylic primers. It's scrubbed up pretty well.
The final issue I had to deal with was the handbrake. Mines been moved to on the floor between the seats, instead of being under the dash. The lever was now up to 6 clicks, which would leave the MoT man unhappy. Reset the rear shoes - no difference. Cable then...... Remove front seats, rear carpet and underlay to access adjuster. Wind it up a bit, and a bit more until we run out of adjustment. Hmm - science time. Some serious measuring finally suggested that the new handbrake brackets are welded to the floor about 1 - 1/2" too far back. There was nothing wrong with the cable, so I have slit a length of tubing and used it as a spacer where the cable outer sits behind the handbrake lever. This itself needed a severe beating with various hammers to straighten out. The cable end of it looked like it had been sat on by an elephant.
Anyway, handbrake now locks third click, so all is good.
She went in for the MoT test yesterday and passed with an advisory. The n/s lower ball joint is now replaced and the world is a good place again.
Chris.
|
|
|
|
Post by threelitre on Apr 19, 2012 7:45:10 GMT
Chris,
ever thought about connecting the timing light to cylinder 2 or 3 (depending which way of 90 degrees out? You should get the correct function then...
Regards,
Alexander
|
|
|
|
Post by dave1800 on Apr 19, 2012 9:15:39 GMT
Hope your trip to York goes well next week and the weather is kind. Please give my best wishes to the LOCI members. I seem to recall that with a new engine the advice was to run it slightly rich to overcome the effect of any tightness? I am confused (easily done) by your dizzy. No matter if it is 90 or any other number of degrees out it should still fire number one (or number 4) cylinders when the crankshaft pulley timing marks align with the appropriate marks on the timing cover. As you know the timing marks are on the bottom of the cover on Mk1 engines but are on the top and easier to see on the later engines. The crankshaft pulley timing marks must be recalibrated if you are using a Mk1 pulley on a newer engine or any other mix and match of timing covers. I'm not sure what came with your Gold Seal engine. So, my advice is you should verify the engine TDC to check the pulley markings so you don't damage your new engine through wrong timing before you take it out again. I used to have a diagram but cannot trace it. A brief description of the markings is at mgaguru.com/mgtech/engine/cs206.htm Regards David Chris the painter, the curator of said artifacts, said he could smell the petrol from the exhaust...... So, a bit of controlled fiddling with the carburettor mixture screws (HIF4s - out is leaner) she managed to settle down at 2.7% with a steady idle and a reasonable balance on the carbs. Book says 3% - 4.5%, but hey - it's a new engine and the carbs have lovely shiny new AAA needles. The timing light was a disaster. As noted earlier, the dizzy drive is 90 degrees out, so the leads on the cap are 90 degrees out, so, the marks on the pulley in relation to the marks on the timing chest cover are 90 degrees out. Got a "best fit" solution by feel and the car now seems positively frisky. Chris. |
|
|
|
Post by threelitre on Apr 19, 2012 10:23:54 GMT
Dave,
indeed - I was thinking of having the crank marks out... D'oh!
Regards,
Alexander
|
|


