|
|
Post by Penguin45 on May 9, 2013 23:44:49 GMT
Radiator duly removed and repaired; re-installed this evening. I would like to make a recommendation for BRITANNIA COOLING, who turned this round in under 24 hours. I asked them to re-solder the neck - they did, then flow tested it, pressure tested it and repainted the top tank for a quite astonishingly small amount of money. Top service. David (being a Yorkie at heart) might even remember them as the Radiator Doctor at the old Sunbeam Works on Canal Road in Armley. Same firm, although the old chap has long since retired. Out of antifreeze, so I'll refill it and go for a run tomorrow. Chris. |
|
|
|
Post by dave1800 on May 10, 2013 1:50:51 GMT
Thanks, I'll pass the info on to my friends in Yorkshire. It's nice to see there are still some good companies around that don't overcharge. Regards David Radiator duly removed and repaired; re-installed this evening. I would like to make a recommendation for BRITANNIA COOLING, who turned this round in under 24 hours. I asked them to re-solder the neck - they did, then flow tested it, pressure tested it and repainted the top tank for a quite astonishingly small amount of money. Top service. David (being a Yorkie at heart) might even remember them as the Radiator Doctor at the old Sunbeam Works on Canal Road in Armley. Same firm, although the old chap has long since retired. Out of antifreeze, so I'll refill it and go for a run tomorrow. Chris. |
|
|
|
Post by Penguin45 on May 22, 2013 0:05:35 GMT
MoT test Friday. "Don't panic, Mr Mainwaring......" Went round the car this evening and I'm pretty happy with it overall - only thing I could find wrong (and I'm not even sure if it's part of the test) was the headlamp flasher didn't work. Torch, multimeter and some upside down grovelling under the dashboard revealed that there was only 6vDC at the purple wires at the connector block. Chased this back to A1 at the fuse block; removed, cleaned and re-crimped the connector and cleaned the terminal and it all worked again. Interior light came back on properly as well. Further checking suggests that the fuel gauge is on the same circuit as well, so who knows what it might tell me now.
Chris.
|
|
|
|
Post by Penguin45 on May 26, 2013 0:34:20 GMT
She passed. Didn't even get an advisory this year. Which was nice......  Chris. |
|
|
|
Post by dave1800 on May 26, 2013 3:07:45 GMT
Well done for the MOT pass another year without worry! I wonder if there are any options for replacing the fuse box and keeping it looking original? These were always a source of problems even when the cars were just a few year old. Perhaps you will find you have a full fuel tank and not half empty now - and what about the temperature gauge I think this is on the same circuit? Regards David MoT test Friday. "Don't panic, Mr Mainwaring......" Went round the car this evening and I'm pretty happy with it overall - only thing I could find wrong (and I'm not even sure if it's part of the test) was the headlamp flasher didn't work. Torch, multimeter and some upside down grovelling under the dashboard revealed that there was only 6vDC at the purple wires at the connector block. Chased this back to A1 at the fuse block; removed, cleaned and re-crimped the connector and cleaned the terminal and it all worked again. Interior light came back on properly as well. Further checking suggests that the fuel gauge is on the same circuit as well, so who knows what it might tell me now. Chris. |
|
|
|
Post by threelitre on May 27, 2013 0:07:16 GMT
On the 1300s I had one with a manky fuse box (slightly different design though). The temp and fuel gauges would drop to zero. But at the same time I would lose fan, indicators and brake lights... Not soooo good.
Regards,
Alexander
|
|
|
|
Post by Penguin45 on May 27, 2013 0:38:10 GMT
It was mildly interesting:
1/ Fuel tank level has increased.
2/ Interior light back to full brightness.
3/ Boot light now working again.
4/ Headlamp flasher operational.
Temperature gauge seems unaffected. Interesting thinking though, the way the circuitry works. Obviously, the flashers are for occasional, momentary use, so routing them through a lightweight instrument/interior lighting circuit was deemed acceptable.
Chris.
|
|
|
|
Post by dave1800 on May 27, 2013 13:08:57 GMT
Interesting thinking? Maybe just the shortest route to save wire!! I am at a loss to understand why the boot light is now working. I would have thought it would previously have been dim like the interior light. I thought the temp and fuel gauges supply was linked so maybe the bi-metallic strip voltage regulators are behaving differently. Car electrics seem to defy the laws of physics! Regards David It was mildly interesting: 1/ Fuel tank level has increased. 2/ Interior light back to full brightness. 3/ Boot light now working again. 4/ Headlamp flasher operational. Temperature gauge seems unaffected. Interesting thinking though, the way the circuitry works. Obviously, the flashers are for occasional, momentary use, so routing them through a lightweight instrument/interior lighting circuit was deemed acceptable. Chris. |
|
|
|
Post by threelitre on May 27, 2013 14:30:38 GMT
All I can say is that the wiring in my Innocenti 1100 (IM3) is way better laid out: Fuses for all and everything (like a modern car) and also relays for important things like main beam and horns  On the other hand, the extreme simplicity of BMC's electrical circuits made them actually rather reliable in my experience. It was really just that 1300's fusebox that gave me trouble over all these years. Regards, Alexander |
|
|
|
Post by Penguin45 on Jun 15, 2013 17:24:25 GMT
The last week has seen a few jobs done in readiness for the LOCI National Rally. Clonk on the nearside turned out to be driveshaft. Pulling it out revealed that the universal joint had noticeable play in it and that the CV boot had split apart. Curious that it's failed less than a month after the MoT test. The joint is a Hardy Spicer HS161 - still available, usually from Land Rover specialists. My local factors came up with a universal fit 75mm CV boot kit (Bailcast DBC700). UJ pretty easy: 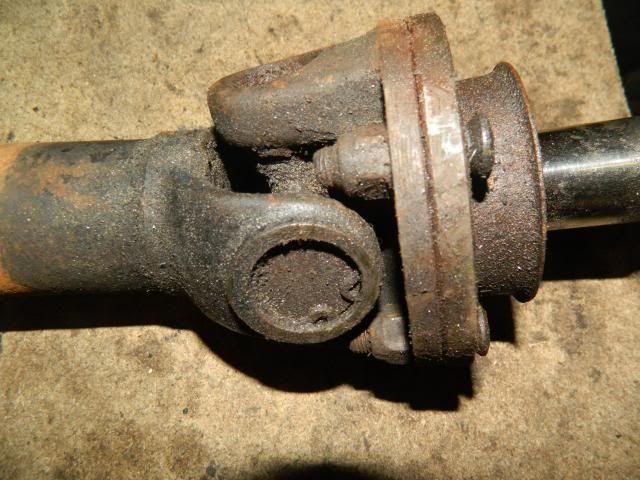 Give it a wipe over. 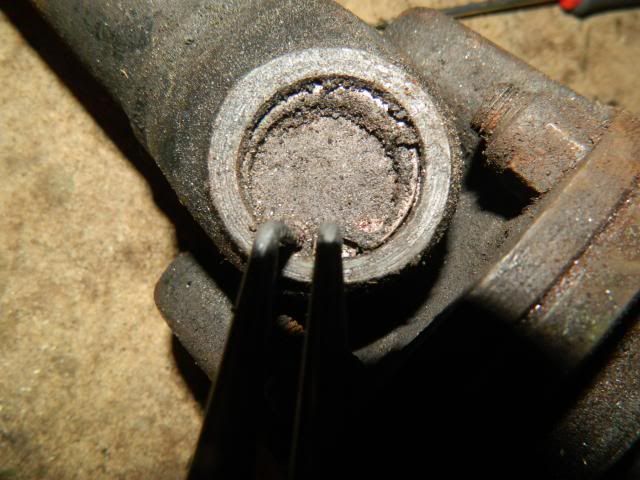 Remove circlips - small screwdriver may be required to chase the clip out of the groove. 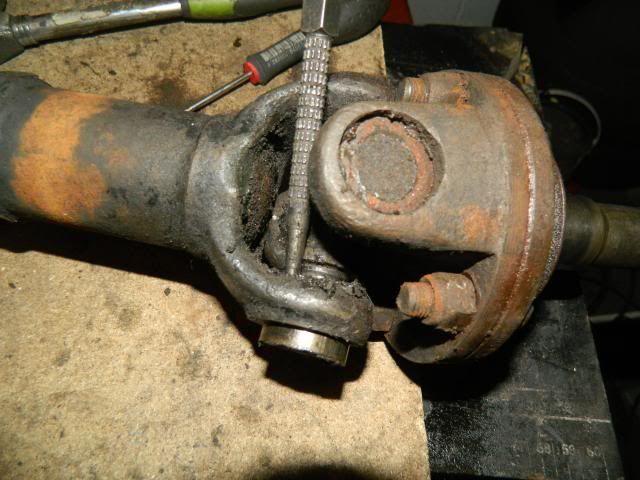 Drive out the cups. Clean the holes through the yokes. 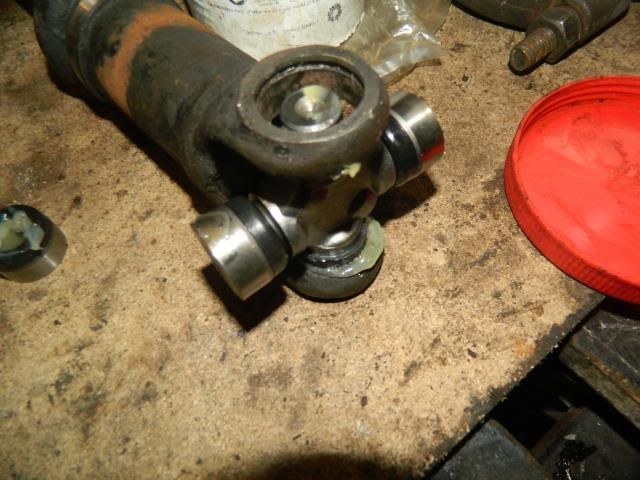 Half fill the first cup with grease, press about 2/ 3 of the way home in the vice and insert new cross-piece. 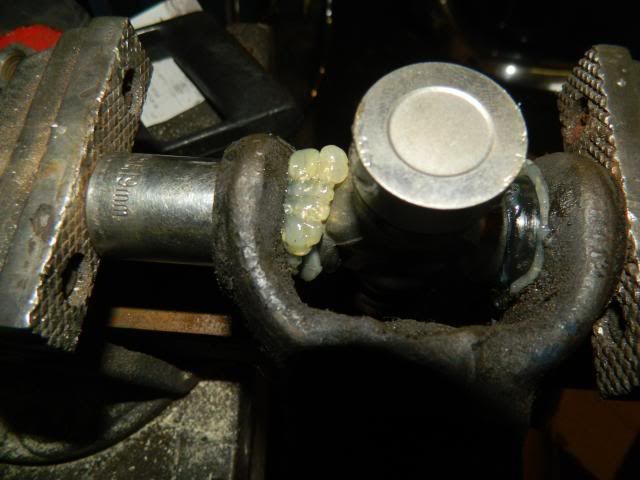 Press home opposite cup. Use an appropriate sized socket to push cups under flush. When under flush, insert circlips and use the socket and vice to push the circlip and cup fully home. Repeat for the other yoke, clean off excess grease, job done. The CV boot was cut off with scissors and the shaft separated (Let the CV joint hang down and give it a sharp tap with a big copper faced hammer - it falls off.). I found that there was very little grease packed into the joint, so I re-filled it with molybdenum grease whilst access was good. Ask the Mrs before you pinch her palette knife to do this..... With the joint separated, the boot can be slid onto the shaft easily, before dolloping some more grease into it. Another sharp tap to reassemble the joint, fit and secure the clips and the drive shaft is ready to re-fit. Whilst the brake caliper was off I finally managed to drill out the broken dust shield bolt and re-thread the hole. Rusty hole in the rust shield itself was welded up and the whole thing painted. With the suspension re-assembled and the brakes bled off, a test drive revealed a major absence of "clonk". Yipee. Additionally, I have replaced the electric oil pressure gauge with a capillary type. The electric sender unit was from a Jaguar and under-read significantly. I pinched the gauge itself from a Six instrument. It's only two screws to remove. I painted the needle white as it was a trifle faded. Moss came up with the capillary tube and an adapter for about £12. The hose is long enough to loop around the outside edge of the engine bay, so is quite discrete. Oil pressure now shows as 70psi. Much better. Oh, yes - replaced the radiator cap as it wouldn't stop weeping. She's had a wash and a polish today, so she's nice and smart for tomorrow. Chris. |
|
|
|
Post by Nick RS on Jun 15, 2013 20:13:45 GMT
Chris
Wish I were going tomorrow, have good trip and take a few pics for us.
Nick
|
|
|
|
Post by Penguin45 on Jun 23, 2013 23:36:30 GMT
Garage blitzed - knackered.
Had to be done........
Chris.
|
|
|
|
Post by dave1800 on Jun 24, 2013 0:40:03 GMT
Did you find anything interesting or you thought lost? David Garage blitzed - knackered. Had to be done........ Chris. |
|
|
|
Post by Penguin45 on Jun 24, 2013 23:52:44 GMT
Quite interesting finding stuff that I knew I had somewhere........
Plus the usual "Why on earth have I still got this?"
Occasionally, you just have to be ruthless.
To be fair, if you are busy with a project or lots of maintenance, it's very easy to lose track of tools, bits, stuff, scrap and the like.
I now have a nice space again. There's a CV joint in the vice on one work bench and a cylinder head sitting waiting for attention on the other one.
Otherwise, it's all neat and tidy. For now...........
Chris.
|
|
|
|
Post by dave1800 on Jun 25, 2013 3:10:32 GMT
You've inspired me to have a tidy up! I kept putting it off when the temperature was 40C but now the rainy season's started it's much cooler. I find it's much easier to lose things as I get older, is that a warning sign  David Quite interesting finding stuff that I knew I had somewhere........ Plus the usual "Why on earth have I still got this?" Occasionally, you just have to be ruthless. To be fair, if you are busy with a project or lots of maintenance, it's very easy to lose track of tools, bits, stuff, scrap and the like. I now have a nice space again. There's a CV joint in the vice on one work bench and a cylinder head sitting waiting for attention on the other one. Otherwise, it's all neat and tidy. For now........... Chris. |
|


