|
|
Post by Penguin45 on May 6, 2020 20:30:39 GMT
Locked up. Bored. Can't get a car in the garage yet. What to do, what to do...... Like any piece of large fixed workshop equipment, the compressor has been used, abused and largely ignored for the entire time I've owned it. It has become unpleasantly loud and gradually slower and slower to charge up to pressure. But mainly the noise. It is LOUD! Well, running out of workshop jobs, so time to investigate. It's a 32 year old Thorite with a 150L tank, a twin cylinder Chinook compressor and a (newish) 3HP motor, so it is a powerful and competent machine. Removing the first two (there are three!) cylinder heads didn't reveal much, but they did clean up nicely.  Compressor Compressor by Penguin 45, on Flickr I suppose really these are the top cover and the upper valve plate.  Compressor Compressor by Penguin 45, on Flickr The actual cylinder head (lower valve plate?) has a blown gasket and a broken reed valve. The "valves" are just flat metal strips, sitting into curved grooves. They're .010" steel, so it didn't take long to cut a new one out of some shim stock.  Compressor Compressor by Penguin 45, on Flickr New gasket, spot the new valve! At this point, I put it all back together and ran it again. It filled to 8 bar from empty in 4 minutes and 30 odd seconds - a vast improvement. Still very noisy. Removed heads again, then off with the barrels.  Compressor Compressor by Penguin 45, on Flickr Beautiful. Completely unmarked or stepped, so fully reusable. 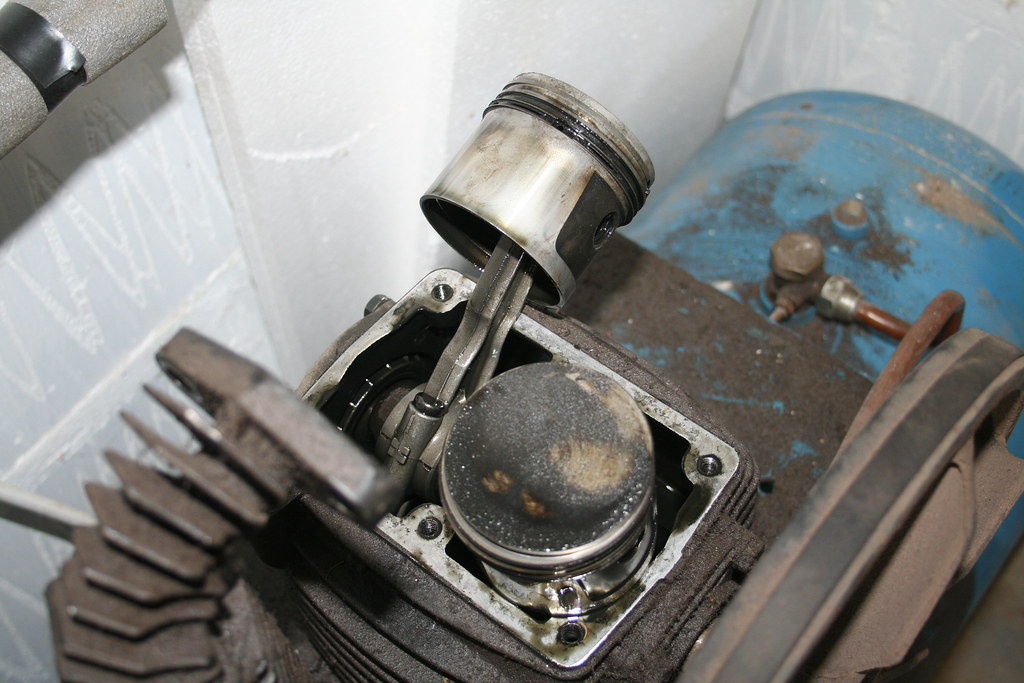 Compressor Compressor by Penguin 45, on Flickr So now we get to the nub of it. That left hand piston is cockled over and rattles when shaken. Little end bearing is shot.  Compressor Compressor by Penguin 45, on Flickr A close study of this masterpiece of the photograhic art shows the bearing has actually ovalled. Trip hammer. The piston itself is undamaged, so I'm thinking conrod. Ever tried buying spares for a Chinook air compressor? There ain't much out there, although I was presented with the opportunity to buy an air compressor for a Chinook helicopter. Flight certified, just $7,500 US. So, no conrod. I pushed out the damaged bearing, which showed the actual rod itself was completely undamaged. Bearing measured up as 15 x 17 x 18mm long. Within 20 minutes, I had bought two (just in case, you know) for the staggering sum of 70p each. Got screwed for the P & P - £3. Spent a happy hour or two after that just cleaning up the works. Will update when the new bearing turns up. Chris. |
|
|
|
Post by Penguin45 on May 7, 2020 10:38:55 GMT
I did find a distributor of Chinook spare parts; FPS Compressors. Just out of interest, I asked for a price for the bearing, pin and valve. I received the following reply.  Compressor Compressor by Penguin 45, on Flickr 'OW MUCH?!?Sorry, had a little Yorkshire moment there. I think I'll stick with Plan A. Given that I can buy a replacement twin cylinder pump locally for under £200, is it any wonder we live in such a throwaway world? C. |
|
|
|
Post by Penguin45 on May 7, 2020 17:23:03 GMT
|
|
|
|
Post by snoopy11 on May 7, 2020 17:33:19 GMT
It creates about five tonnes of compressed air.
Some people are just never happy however hard you try to help.
|
|
|
|
Post by Penguin45 on May 7, 2020 18:24:25 GMT
It's a helicopter. It only flies because it's so ugly the Earth repels it.
C.
|
|
|
|
Post by 1800heap on May 11, 2020 9:13:02 GMT
Thanks Chris you got me thinking about my squashing machines. I have 3 of them connected together to give me enough air to sand blast. When I got the sand blaster it was too expensive to get a big compressor to replace the little one I had. I decided to get another cheap small one and connected them together! Just enough to do small bits of sand blasting. Recently I aquired a twin cylinder unit cheap and added that in as well. Didnt really pay much attention until now you got me thinking. Did some research and it turns out to be a Fusheng VA-65 and should be pushing out 265 L/min.. If I only use it to pump the tanks it is only just quicker than the 122 L/min new one on its own! Worth some investigation I think. I still need a bit more air for the blaster even with 3 going! I am going to have to pull it apart now.
Nick
|
|
|
|
Post by 1800heap on May 11, 2020 9:19:18 GMT
Luckily when sand blasting you need ear muffs anyway!  |
|
|
|
Post by Penguin45 on May 12, 2020 16:00:33 GMT
Ahaha! Sewing the seeds of doubt.... Pretty straightforward really. Apart from setting the ignition timing afterwards. Looks like Glenco are the parts people. Anyway, mine is officially dead. Here's how it played out...  Compressor Compressor by Penguin 45, on Flickr Little end bearing turned up. Pushed home nicely, fitted piston, pin and clips, rebuilt pump, bolted it back to the machine and away we went. Still horrendously loud. Remove pump, unbuild. The bolts must know the way by now. Little end still seems somewhat wobbly. Pull clips and pin. Pin a nice fit in bearing, look more closely at piston. With a bright light and peering closely inside, you could see that the hole has ovalled upwards.  Compressor Compressor by Penguin 45, on Flickr Like that. Bum. Some careful probing revealed that the wear was upwards only. Went into house. Spent £160 with Machine Mart. Checked eMail (Capital M inserted to differentiate from alternator). Up to ten days delivery. Stronger cuss word invoked. There must be some way of locking the pin for a week or so? What played out would be called "A proper bush fix" by my Uncle Jim (He's in Adelaide) and will probably lead to my mate Ron turning up unannounced and confiscating my spanners. He will go absolutely banana poo (Pratchett reference). Marked out the centre line across the top of the piston and drilled two 5.5mm holes, then tapped them to ¼" UNF. Next, chopped the tops off two ¼" set screws and slotted the tops.  Compressor Compressor by Penguin 45, on Flickr  Compressor Compressor by Penguin 45, on Flickr This sort of happened. That pin ain't going anywhere. Put it all back together again and fired it up. Yay! Success. It's down from trip hammers to thunderously loud. Oh well, it's only got to last another week or so. C. |
|
|
|
Post by 1800heap on May 12, 2020 23:37:03 GMT
What a bummer Chris just when you thought you had it! Thats a great fix though. They call that bush engineering over here. Probably last for years if you hadn't already ordered the bits! Glad to say in about 20 minutes of work this morning I have got my one pumping up the tanks over a minute faster than it was. It seems I got a bargain for 50 dollars. They look really tough inside too. No wear what so ever on the boars even though it is as old as the hills! Full of crud though because the filters are missing. It sucked my hand to the top of the bores so the rings are ok. All I did was popped the heads and cleaned out the years of crud blocking the inlet valve. Plus I reseated one of the inlet valves by turning it over. Its a little plate and a spring. As you say parts available if required.
Thanks again Chris well worth the effort.
Nick |
|
|
|
Post by Penguin45 on May 18, 2020 20:25:45 GMT
Well done, Nick. They're simple machines really. So, did it last? It didn't really have to do much, as the new pump turned up today, so we'll never really know. 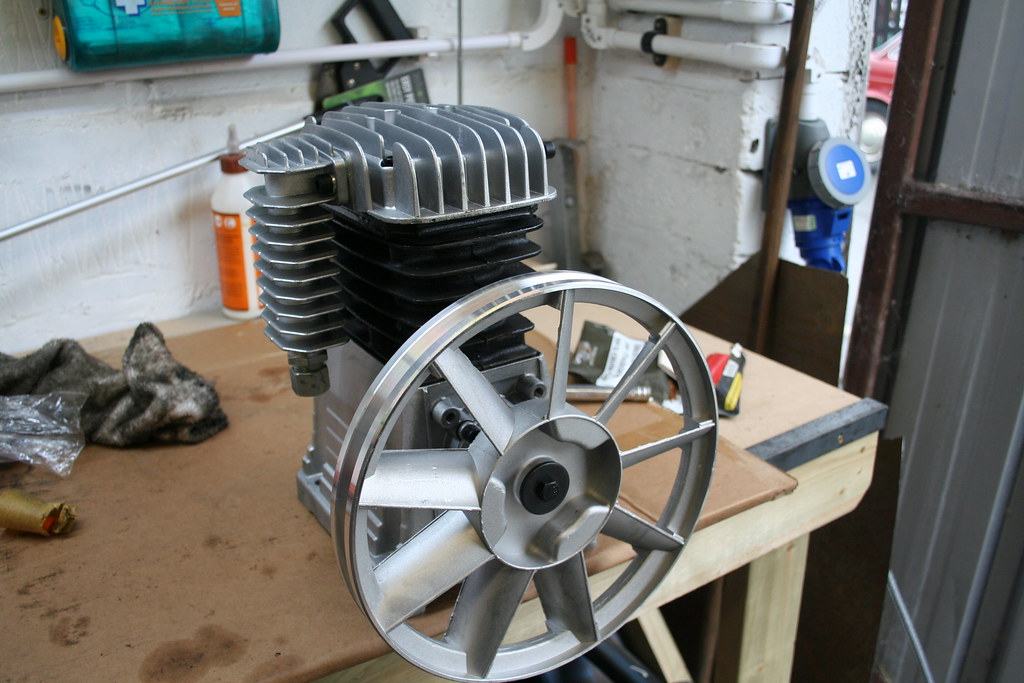 Compressor Compressor by Penguin 45, on Flickr I was a little disappointed. I had to pull the head off to fit the inlet and exhaust on the correct side. The barrels and piston tops were absolutely filthy, so that all had to be cleaned off. Looking more closely revealed swarf in the various tapped holes, so that had to be chased out. The machine had no oil in it. The box looked rather stained, so I suspect it made its journey from China upside down..... Anyway, time to fit it to the machine. None of the pedestal bolts line up with any of the existing holes. No problem, drill some new ones. Now the guard won't fit without surgery. With the angry grinder. I got it done in the end.  Compressor Compressor by Penguin 45, on Flickr There it is, with a few modifications and updates.  Compressor Compressor by Penguin 45, on Flickr New safety valve fitted (the old one would randomly hiss) and an hour counter. This is spurred off the drive motor. The oil should be changed after every 60 hours of running, so now I can keep tabs.  Compressor Compressor by Penguin 45, on Flickr And the remote inlet and filter. Makes a surprising difference to the noise level. This will finish up outside the box when the timber is finally delivered. The machine is now down to merely loud. It's a deeper sound with no clattering and clanking, so is already much more acceptable. C. |
|
|
|
Post by 1800heap on May 18, 2020 22:58:50 GMT
Back to squashing the atmosphere Chris! Do you mind me asking what the unit cost you?
Nick
|
|
|
|
Post by Penguin45 on May 18, 2020 23:36:13 GMT
Hi Nick, I bought the Clarke NH3AP from MachineMart - HERE. With delivery ran out at just short of £160. As stated, quite glad I had to partially strip it as hopefully I've avoided some issues. Safety valve was about £10, hour counter about £12 and the filter £6. Filter makes a surprising difference. It's mounted about 3' away from the actual pump and completely kills that "Bup bup bup bup" intake noise. I used plastic pipe; I've also seen it done with rubber hose. Chris. |
|
|
|
Post by 1800heap on May 19, 2020 2:56:24 GMT
Hi Nick, I bought the Clarke NH3AP from MachineMart - HERE. With delivery ran out at just short of £160. As stated, quite glad I had to partially strip it as hopefully I've avoided some issues. Safety valve was about £10, hour counter about £12 and the filter £6. Filter makes a surprising difference. It's mounted about 3' away from the actual pump and completely kills that "Bup bup bup bup" intake noise. I used plastic pipe; I've also seen it done with rubber hose. Chris. Thats seems like an ok price. Bit annoying to fine poor assembly practices. I think you have saved yourself some issues! I might put a couple of filters on mine and follow your example. The one I have has a slot for a piece of foam right on the head. Its an old version so not a screw on filter. Missing foam of course! I think I might try to rig something like you have. Nick |
|
|
|
Post by Penguin45 on May 27, 2020 21:33:29 GMT
Just to wrap this up, Wickes finally delivered this morning (a month!), so set to on the acoustic housing. 2" x 2" s, ½" OSB board and Rockwool sound insulation.  Compressor Housing Compressor Housing by Penguin 45, on Flickr 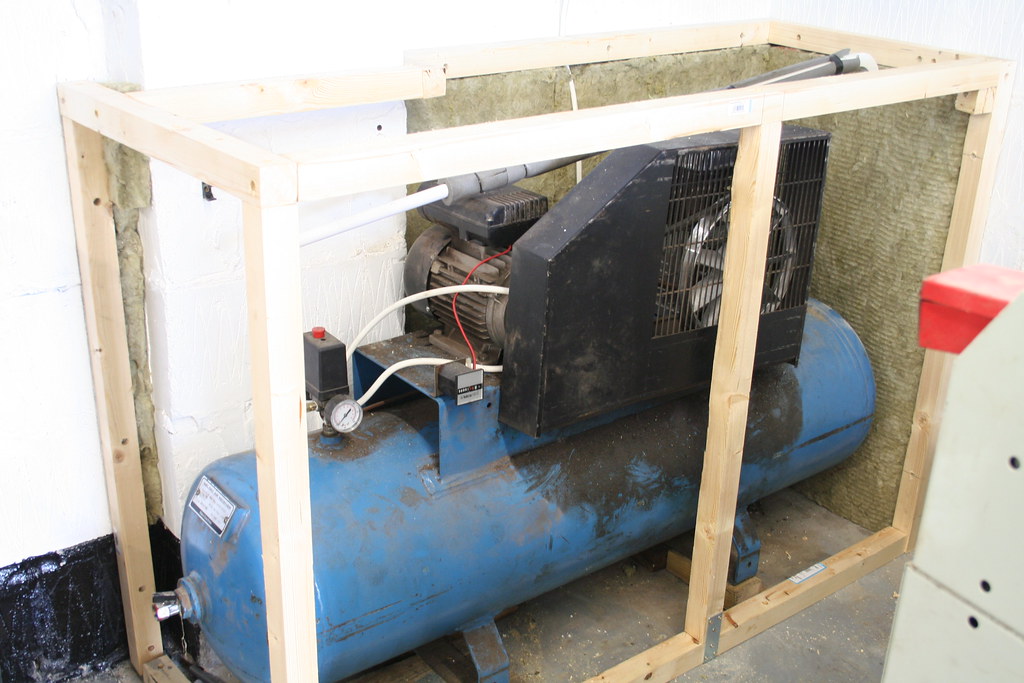 Compressor Housing Compressor Housing by Penguin 45, on Flickr  Compressor Housing Compressor Housing by Penguin 45, on Flickr Quite pleased with that bit - got the holes in the right place!  Compressor Housing Compressor Housing by Penguin 45, on Flickr Top layer of Rockwool in place. Did a zigzag thing underneath with screws and garden wire. 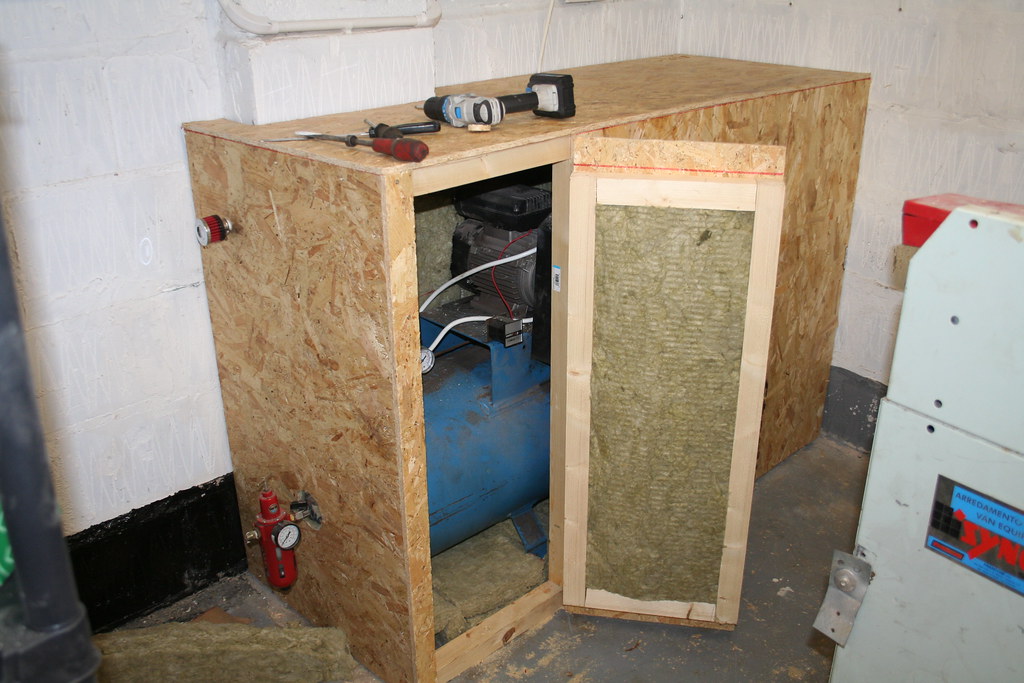 Compressor Housing Compressor Housing by Penguin 45, on Flickr Acces door got lagged inside. 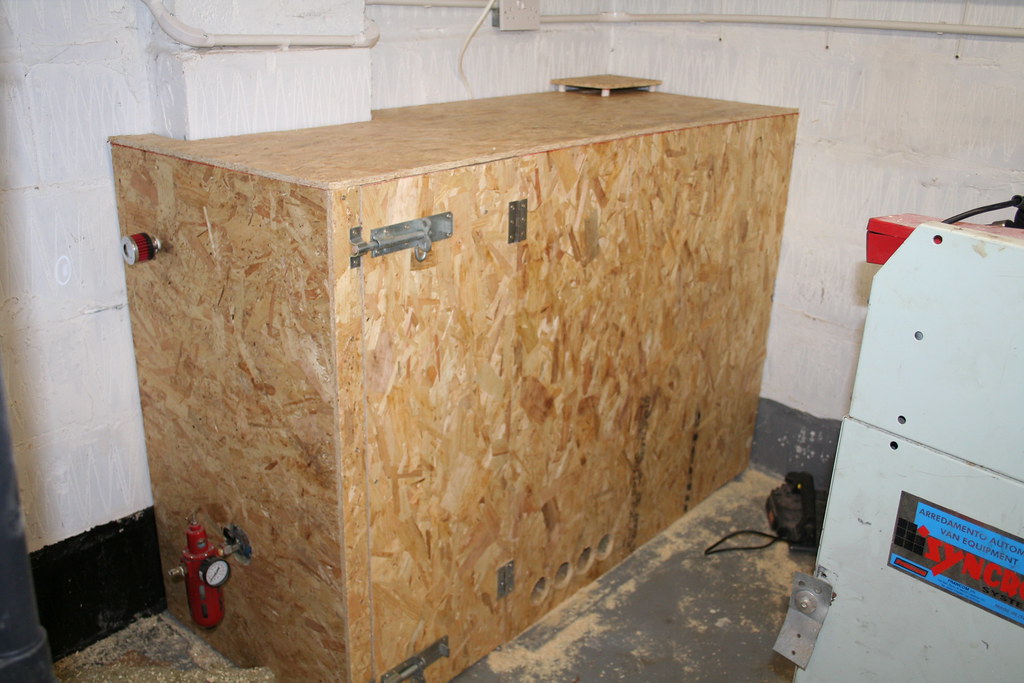 Compressor Housing Compressor Housing by Penguin 45, on Flickr And all done. Ventilation intake holes at the bottom, venting out top right. Put a cover over them as anything falling in there is never going to be seen again. Air intake filter top left, master tap and regulator below. Added a couple of bolts to the door just in case it gets an urge to slip out and paint Padiham red. Suppose I'll have to paint it white now. Anyway, MrsP brought a cup of tea over and we set it running. We had a conversation without having to raise our voices. Nice. Pretty pleased with that. Chris. |
|
|
|
Post by Penguin45 on May 28, 2020 17:50:48 GMT
|
|
 Compressor by Penguin 45, on Flickr
 Compressor by Penguin 45, on Flickr
 Compressor by Penguin 45, on Flickr
 Compressor by Penguin 45, on Flickr
 Compressor by Penguin 45, on Flickr
 Compressor by Penguin 45, on Flickr
 Compressor by Penguin 45, on Flickr
 Compressor by Penguin 45, on Flickr
 Compressor by Penguin 45, on Flickr
 Compressor by Penguin 45, on Flickr
 Compressor by Penguin 45, on Flickr
 Compressor by Penguin 45, on Flickr


