|
|
Post by 1800heap on Aug 26, 2017 3:34:08 GMT
Hi David Thanks for the heads up about the oil thrower. I have managed to sort out the involute gear drawing I think yes. I am not happy with the pitch so I will probably change it. I have printed the new part and actually fitted it to the engine roughly. It just fits with a slightly modified tensioner. I am going to have to move the tensioner to improve the angles. There is a new problem I have noticed. One idler ends up close to the water pump so my plan for the timing cover will have to change! Anyway here is a video clip which shows the operation. Not quite there but works more or less! Click on the photo 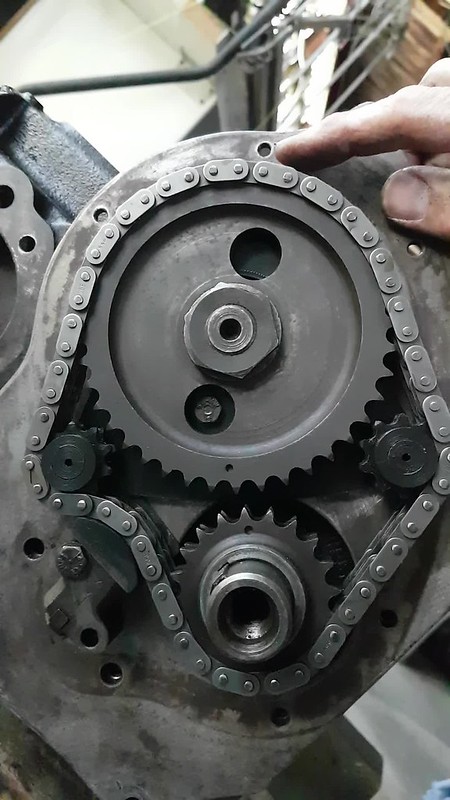
VVTNick |
|
|
|
wipers
Aug 22, 2017 2:17:44 GMT
via mobile
Post by 1800heap on Aug 22, 2017 2:17:44 GMT
I agree with Snoopy clean all electrical connections. Failing that it probably wants pulling apart and cleaning and regreasing. Particularly the cable and mechanism that operates the blades.
Nick
|
|
|
|
Post by 1800heap on Aug 20, 2017 2:15:37 GMT
Wish my engine bay looked like that!!
Nick
|
|
|
|
Post by 1800heap on Aug 19, 2017 9:39:02 GMT
Forgot to mention I had thought of the simplex chain but I think the relatively tight bend around my idlers may stress it too much. I will go there if I really have to though.
Nick
|
|
|
|
Post by 1800heap on Aug 19, 2017 9:34:47 GMT
Thanks for the Moss links they were very interesting. Should help when the time comes.
I am almost ready to print version 5 of the assembly which should fit much better I think. I will shim the cam cog 0.05" to improve my clearance issue, then I think it will be ok. I will have to do the same with the crank gear obviously, so I hope that doesn't cause any unseen problems. The cam locating plate is part of my assemby so adding 0.05" to that is easy. I am just trying to get my head around how to CAD draw an involute gear properly for the mechanism. It takes about 7 hours to print the idler plate so I want to do a first try of the gear section on this print! Watching plenty of utube videos about it!
Nick
|
|
|
|
Post by 1800heap on Aug 19, 2017 8:57:21 GMT
Glad to hear all good mate. Thought it was a bit harsh reading the WOF rules!
Well done.
Nick
|
|
|
|
Post by 1800heap on Aug 17, 2017 6:57:00 GMT
Thanks for all the info David.
I usually look at posts on here with my phone but it refuses to open links on the forum for some reason. I haven't had a chance to look at the Moss stuff yet as I have to use a PC to do it!
Nick
|
|
|
|
Post by 1800heap on Aug 14, 2017 9:24:09 GMT
|
|
|
|
Post by 1800heap on Aug 14, 2017 6:26:00 GMT
There are a couple of more imaginative options but they are probably all illegal! Infact definitely illegal, strike that!!
Nick
|
|
|
|
Post by 1800heap on Aug 14, 2017 5:39:53 GMT
So you have three options. One replace the servo an bite the bullet. Second, I can't see non OEM being the problem as many parts fitted to cars are non OEM replacements. He is worried that it is a performance mod. ADRS in Oz I believe require certification of non OEM as functionally the same then all is good. I suspect NZ is the same. Otherwise you would be stuck with paying top dollar for all parts from the manufacturer! So you need to show the part is a direct replacement. If you are lucky Lockheed has noted this servo as a direct replacement for either the PBR or Girling servo then you have to appeal to their judgment. Third get a mod plate for it.
Nick
|
|
|
|
Post by 1800heap on Aug 14, 2017 3:47:46 GMT
How many crabs would a garage see! Man thats bad luck mate. I'd be worried if the brakes were not working properly but otherwise amazed they picked it! Do you pay for a retest?
If so I would head somewhere else!
Good luck
Nick
|
|
|
|
Post by 1800heap on Aug 14, 2017 3:41:15 GMT
Hi Aaron
At the moment the list of part numbers for the displacer type you are looking at is
47H9543 - 1800 / 1100
11H1888 - 1800
11H2158 - 1800
31G731 - 1100
31G8122 - 1100
37G5559 - 1100
Any additions or corrections to the list would be appreciated.
I have seen red dot (1800) and a blue dot displacer fitted to crabs. Mostly reds. I have not made any correlation for dot colour to part number as yet. I can't help you much with 1100 colours. I can tell you the likley differences will be to the cone, the rubber compound (Stiffness) of the spring (pipe end) and the damping rate set on the inturnal valves. I am unaware of any design difference inturnally. They certainly seem to be interchangeable given cone differences and hose length.
From the testing I have done on displacers to date, condition has a dramatic effect on the the displacer performance. I would say more so than any differences in the units given the correct length setting and ancillary parts.
A good indication of the condition of the spring rubber is the position of the hose crimp relative to the back of the displacer can, when depressurised. If you look accross the back of the displacer edge to edge, on a unit in good condition you will not see the hose crimp, just the hose. Imagine a straight edge accross the back of the can, the more the metal hose crimp crosses the straight edge the more deformed the rubber is! This is generally not good.
You can play with the length/pressures up to a point if you want to change how the displacer reacts. This will effect trim heights though.
Matching displacers is a good idea.
Pre-filling the unit before fitting it to the car is also a good idea. This is especially the case with the crab, as they lay on the side. If you are not evacuating the air before pressurising, prefilling the unit will help keep air to the minimum. Not evacuating happens alot as people generally use hand pumps for filling. Note this is only required when replacing displacers. Any air in the unit between the diaphram and valve plate will effect damping and any air effects the spring rate because of its compressability.
Hopefully I have been of some help!
Regards
Nick
|
|
|
|
Post by 1800heap on Aug 13, 2017 22:00:40 GMT
Hi Andrew
Wow the guy doing your WOF was how shall I put it, thorough! I have seen the wooden seat shims on several vehicles Australian and UK and would guess it was a dealer mod. No sign in the parts manual Unfortunately, David might have some better info! Just take them off to save the argument! As for the servo what type do you have on the car?
The other advice I have is take it somewhere else! I had a similar thing in the uk with the power steering on my car and the tester refused to pass it because of a lack of knowledge of how the valve assembly works. He thought it was faulty because it moves! I took it to a different test station low and behold all good!
Nick
|
|
|
|
Post by 1800heap on Aug 13, 2017 9:32:06 GMT
Hi all
A quick update on the VVT project.
I have managed to prove the principal. I still have several issues to solve including getting oil to the various parts required. I have 3D printed a couple of cogs and parts and made a mock up. The clearances are very tight but it might just work. I think I can get at least 12 degrees adjustment on the cam sprocket. Unfortunately I will have to redesign the front plate and obviously the timing chain cover to suit the new setup. Not at this stage though! I am trying to keep the tensioner with a mod to the slipper head. I am not certain if this is possible until I have fiddled with the geometry a bit. It is all a very tight fit!
Those of you who have done some work with hotter cams I need a little direction. I am very green with the setup of the timing of these cams and need a little help with this side. I have only done the standard timing setup. Ie two dots lined up on a standard cam! I am wondering how I would work out where to set the best center point to give a useful range of adjustment, to get the best results out of a cam. I suppose this will vary with the cam?
Also can anyone tell me how the vernier cam sprocket compairs clearance wise to a standard sprocket. I am interested in the rear clearance, as part of the mechanism will tuck in behind a standard cam sprocket just!
Regard
Nick
|
|
|
|
Post by 1800heap on Aug 13, 2017 8:54:09 GMT
More Fans here!
Very impressed with the video of the finish you posted! I had to pause it to prove to myself it was infact a landcrab as you went past so quick it was hard to tell for sure!
Nick
|
|

